Cotton Candy Drawing Ideas
There are sure food varieties and treats that have come to be related to specific occasions and places. Cotton candy is one of these, as this sweet treat is frequently connected with fairs, parties, and other euphoric events. This treat is very straightforward, as it lightens up sugar. In any case, how it’s made and the deliciousness it offers have made it a pleasure for some. [If you find kids’ education related data so visit our easy drawing for kids site].
It can likewise come in many sizes and varieties, and figuring out how to draw cotton candy is an extraordinary method for recovering that fair feel! Assuming that you love this sweet treat and might want to know how you can reproduce it in some fine art, then, at that point, this instructional exercise will be ideally suited for you. Our bit-by-bit guide on the most proficient method to attract cotton Candy in only 6 stages will show you how fun and simple it tends to be!
Stage 1 – Cotton Candy Drawing
While getting a charge out of cotton Candy, it very well may be consumed in various ways. In some cases, it will be folded over a slight wooden stick, and at different times it tends to be delighted in from a paper cone. We will be going during the current subsequent choice in this aide on the most proficient method to draw cotton treats, and we will begin with that perspective.
This ought to be basic, as the need might arise to define two straight boundaries that have a slight bend at the tip. Once these are drawn, you can then include a few adjusted lines top of this cone shape for the foundation of the cotton treats itself. Then we can continue on toward stage 2 of the aide!
Stage 2 – Presently, draw the following part of the cotton treats
In this second piece of your cotton Candy drawing, you will add the following segment to develop it a piece. To do this, we will add a few additional bent, adjusted lines to the foundation of the cotton Candy.
These lines will seem to be like the past ones that you utilized for the base. Some of them will cover with each other, as this will make it look fluffier. For the present, we may be drawing cotton candy at the base, yet we will add more segments as we continue to future advances.
Stage 3 – Draw the sides of the cotton Candy
Going on with this aide on the most proficient method to draw cotton Candy. We will presently be adding the sides of the fleecy treat. These lines will be the same as the past ones that you drew, and they will be exceptionally uneven. Defining the boundaries this way will assist with making it look overall quite puffy.
While drawing the sides of the cotton treats, attempt to have them bend outwards a little, as we’re holding back nothing shape to the cotton candy overall. At the point when you have drawn these side areas, we can then continue toward stage 4 of the aide!
Stage 4 – Next, draw the remainder of the blueprint for this cotton Candy
This piece of your cotton Candy drawing will see you wrapping up the blueprint before you add a few last subtleties in the subsequent stage. To begin with, define a few additional bent boundaries to polish off the diagram for the highest point of this cotton Candy.
The two highest lines will cover each other as displayed in our reference picture, and this will assist with making the type of cotton treats look somewhat more unique. When this framework is finished, you will be prepared for those last subtleties that we referenced, so we should continue on!
Stage 5 – Add the last subtleties to your cotton treats drawing
Presently you’re prepared to polish off the last subtleties and contacts before the last step of this aide on the most proficient method to draw cotton Candy! These subtleties will be genuinely minor, however, they will have a gigantic effect in making this picture more unique. To begin with, add a few bent lines along the internal edges of the sides of the cotton candy to add some profundity.
Then, at that point, we will add a few stripes along the cone that you attracted before to give it a smidgen even more a festival feel. Whenever you have added these subtleties, you could likewise add a few extraordinary ones of your own! One thought is to draw a foundation, and this would be an extraordinary method for flaunting what area you might want to partake in this cotton candy. What sort of setting could you put this treat in?
Stage 6 – Polish off your cotton Candy drawing with Variety
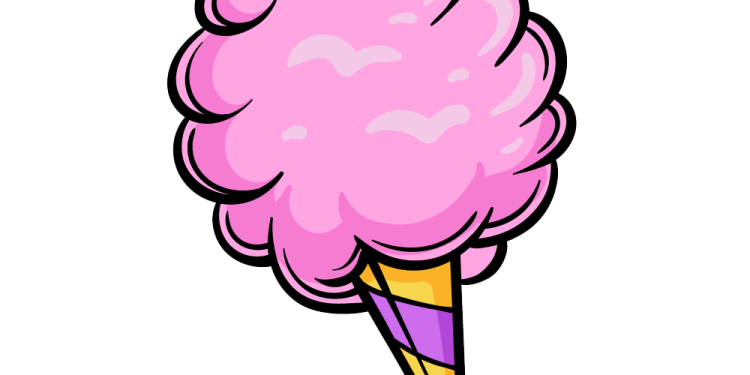
Presently it is the right time to polish off this cotton Candy drawing with some tone. This food is normally hued in brilliant, bright tones, and this provides you with a ton of opportunity with how you can variety it. In our reference picture, we involved different tones of pink for the cotton Candy itself, and afterward for the cone we utilized yellow and purple exchanging.
Here you could utilize any varieties you love, be that as it may! You really might blend various varieties for a rainbow impact to the cotton treats. Our idea is utilize some watercolor paints for a gentler shift focus over to the varieties, however anything you use will look extraordinarily perfect! What tones and mediums will you go with?